


Worked great on a craftsman 54” mower
Frequently bought together
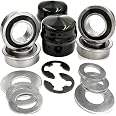
This item: (4 Pack) HD Switch Front Wheel Bushing to Bearing Conversion Kit fits Husqvarna 532009040 9040H 532124959 5920H, 9040HR 9040N Husqvarna Sears Craftsman Poulan Jonsered AYP Garden Tractor Lawn Mowers
$30.00
Get it by Wednesday, Aug 6
Only 7 left in stock.
+
$11.99
Get it by Monday, Aug 4
In Stock
Total price:��$00
To see our price, add these items to your cart.
Choose items to buy together.
Videos for similar products
Brand in this category on �鶹��
Sponsored

Brands in this category on �鶹��
Sponsored
Top reviews from Canada
There was a problem filtering reviews. Please reload the page.
-
Reviewed in Canada on April 21, 2024Verified Purchase
- Reviewed in Canada on October 1, 2022Verified Purchase

Top reviews from other countries
-
ERIC TORRES-UReviewed in Mexico on December 5, 2023
Excelente producto.. queda a la medida..
Verified Purchase Muy bueno... fácil instalación... Mucho mejor que los bujes originales...ERIC TORRES-U
Excelente producto.. queda a la medida..
Reviewed in Mexico on December 5, 2023
Images in this review

- Chris C.Reviewed in the United States on July 18, 2025
Replacement bushings
Verified Purchase - Jeb RollinsReviewed in the United States on June 24, 2025
Still rolling
Verified Purchase -
RomeroReviewed in Mexico on September 22, 2022
No se ven los baleros de buena calidad, espero que no tenga que cambiar mi reseña por algun defecto.
Verified Purchase - �鶹�� CustomerReviewed in the United States on June 23, 2021
Great replacement!
Verified Purchase
